

Table of Contents:
- Introduction
- Preparation
- Installation Step-by-Step Instructions
- In-Truck Remaining Instructions
- Conclusion
Introduction:
Before we proceed, we want to thank you for pursuing the engineered and machined in-house Project Carbon™ AS69RC Valve Body DIY Upgrade Kit. As the name suggests, this is the 5th update to our coveted Project Carbon™ AS69RC Valve Body Upgrade kit. This 5th update includes the steel precision machined center support studs, securing it’s reputation as the ultimate valve body solution for the AS69RC transmissions. The purpose of this article is to demonstrate how to properly install the easiest to use AS69RC Valve Body Upgrade kit in the world, our Project Carbon™ Valve Body Upgrade kits!
Preparation:
As preparation for installing the Project Carbon™ AS69RC Valve Body Upgrade kit to the transmission itself you’ll need the following tooling:
- (1) 10mm Socket
- (1) Inch Pound Torque Wrench
- (1) 8mm Socket
- (1) Bit necessary for the pan bolts, this may vary depending on the pan being used.
- (1) "C" Clamp (Recommended) to compress piston springs, some are a bit difficult!
Once these items are procured, it’s time to begin the installation process of the kit! If the transmission is currently in the truck, please do the following, if it is removed from the truck, skip to the next section:
1 - Park the truck on flat ground, employing the parking brake and chocking one tire facing downhill or on both sides for additional safety. You’ll be removing the valve body completely from the vehicle, which does not necessarily remove it from park, but makes it easier for the transmission to potentially pop out of park. Hence, safety precautions should be taken to ensure the vehicle stays stationary. (Over-achievers may just use a lift for this step)
2 - Allow the truck to cool down to ambient temperature. This takes about 2 hours. To be productive, put your Project Carbon™ Billet Accumulator Piston Set inside the freezer. Why? Our tolerances are so perfect, the pistons are easiest to install frozen. They shrink a few micrometers and that makes a difference! Once they get back to room temperature, they’ll seal perfectly.
3 - Once the truck is nice and cool, proceed to the next step.
Installation Step-by-Step Instructions:
*Keep in mind, this process requires changing the filters and pan to case seal from the original, so this guide will be written from the perspective of someone who also purchased our AS69RC OEM Filter & Service Kit.*
1 - Remove the OEM pan completely. If your pan is fitted with a drain plug, you’ll like to use it now to drain the oil in a clean fashion. Drain your oil into a secure container and dispose of it properly. Do NOT reuse your old oil!
2 - Remove the 3 bolts that secure the pan filter to the valve body. Remove the filter and throw it away.
3 - Use the image below to remove the proper valve body to case bolts. Remember the location of the bolts specifically as some may be different and it's imperative that they go back to the same place. Remove all wires from the valve body itself. It may be helpful to take pictures to remember where every wire goes as they are color coded and can easily be put in the wrong location, causing immediate problems.
4 - Take the valve body off of the vehicle and place it on a clean surface with the solenoid body side down and the smaller portion up. Begin by removing all of the bolts, using the picture below as a guide for their locations during re-installation. There are 4 different sized bolts, all numbered accordingly here. 1 is the longest, 2 is second longest, 3 is shortest and 4 is equal length to 3 with a portion of the bolt being not threaded.
5 - Carefully flip the valve body over, not allowing anything to fall out of place as the bolts are now removed. Now, remove the solenoid half of the valve body from the valve body assembly, holding the separator plate up against it. You should see the valve body half with the check balls and springs beneath you. Set the solenoid half next to it with the oil circuits facing up, and set the separator plate to the side so that it is out of the way. None of these need to be removed to install the upgrade kit, although it may be easier; your choice!
6 - Remove the accumulator backing plate from the solenoid half of the valve body. It's a small plate facing the outside of the valve body. Inside there will be 2 accumulators, remove them and discard.
7 - On the sides of the solenoid half of the valve body, there are 2 other accumulators held in by a metal retainer. Remove said retainer keeping in mind what position it was installed in and set aside for reassembly. Remove and discard both pistons.
8 - Next, in the upper half where the check balls and springs are, there are 2 remaining accumulators. One is the larger, K1 dampener. Follow #7 instructions to facilitate their removal as well.
9 - Now, remove the accumulators and dampener from the freezer and apply some transmission fluid or transmission gel to lubricate them. Install all 5 accumulators and 1 dampener in their corresponding locations, re-installing the retainer in the position it came out. A C-Clamp may be helpful for compressing some of the springs. All smaller pistons are interchangeable.
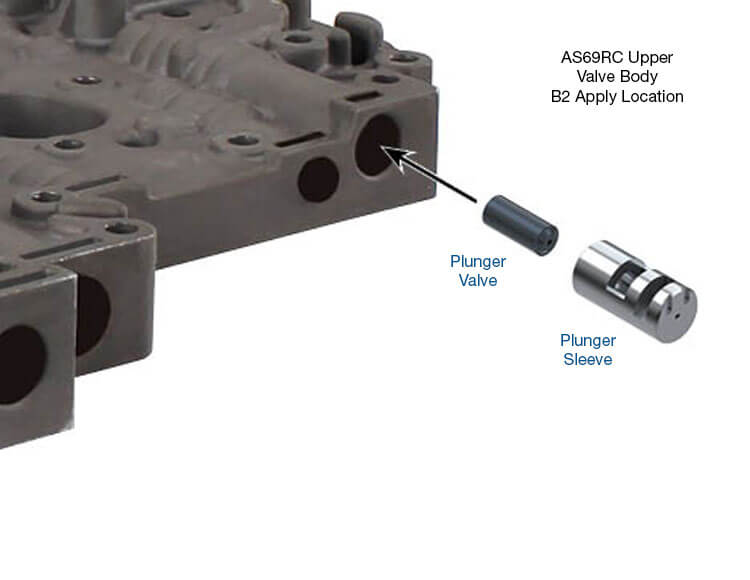
10 - Now look identify and remove the 2 valve and sleeve systems for B1 and B2 using these images as a guide. This will ensure that these failure-prone valves never crossleak over time.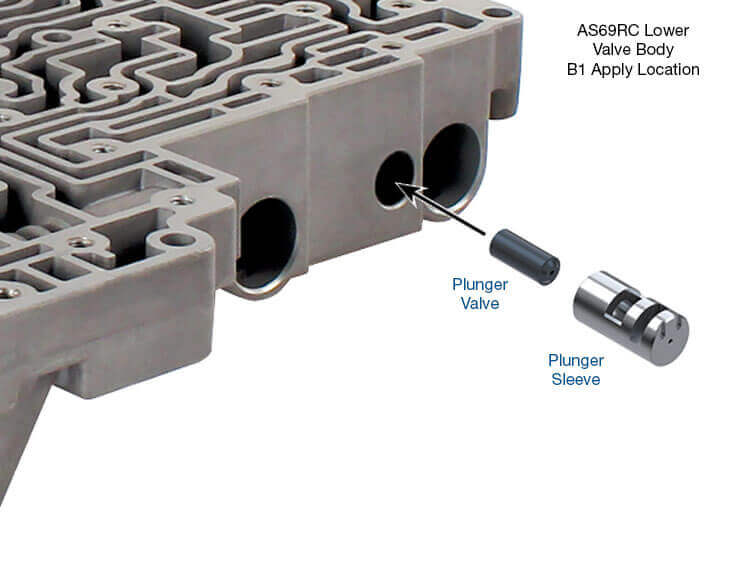
11 - Next, replace the secondary pressure regulator valve using the following image as a guide. Much like the previous step, we are making sure these valves do not leak in the future.
12 - At this point, inspect both halves of the valve body and ensure that no steps have been missed and all parts are correctly installed.
13 - Now, the valve body must be reassembled. Put the included laser-cut separator plate and solenoid half of the valve body back on the half with the springs and check balls, ensuring all springs, balls and otherwise are in their proper place. Torque from the inside to the outside in a spiral fashion at 88 inch pounds.
14 - Connect the accumulator backing plate to the valve body, torqueing at 60 inch pounds with some red loctite.
15 - Take your assembled valve body, and bolt it back into the transmission case at 88 inch pounds using the same bolts used to hold it the first time.
16 - Reconnect all wiring to the valve body exactly as it was found during removal, the pictures taken earlier will come in use here.
17 - Bolt the new OEM Aisin Seiki filter to the valve body at a torque of 60 inch pounds, lubricating the O-Ring on the filter with some transmission fluid or transmission assembly gel.
18 - Reinstall your pan, following proper torque procedure for the pan you are using. If an OEM pan is being reused, the specification is 105 inch pounds. Be sure to either use RTV or a pan gasket (preferred) to ensure proper seal.
19 - If using an aftermarket pan, be sure to re-install the drain plug or temperature probe plug if applicable.
Congratulations! You’ve installed the Project Carbon™ AS69RC Valve Body Upgrade kit, now it’s time for the driving break-in.
In-Truck Remaining Instructions:
1 - Now we will begin filling the transmission, with the motor turned on and the truck now in neutral, with oil. Let the dipstick be your guide. We recommend Mopar ASRC oil or the Aisin Seiki OEM oil available on our website.
2 - Take some oil with you on your maiden voyage as there are certain clutch packs that won’t see oil until you ascend into higher gears; such as overdrive. You will likely need to add a quart or two during your initial drive because of this. Also, pumps that leak oil out of the converter are a common pump crossleak and hence the converter can often be a bit empty during the initial drive. For all of these reasons, keep it under 30% throttle just for now!
3 - If this is just a shift kit install, break-in is 50 miles. If you installed this as part of a complete transmission build, we highly recommend a 500 mile break-in. Drive the truck at under 30% throttle in a variety of real life conditions, ranging from stop and go to highway environments. It is most important during a drive-learn to drive naturally but cautiously! The transmission is “waking up from surgery” and does not need any aggression during the break-in process.
4 - Once break-in is complete, enjoy your radically different transmission!
Conclusion:
This kit is designed to be incredibly easy to install, and yield maximum improvement to the problematic AS69RC with innovative and exciting product solutions to real world problems. We’re thankful that you chose this product, and hope to be your first recommendation for all performance drivetrain needs. If you still have questions about your installation, call in and speak to one of our experts!


Comments (1)
Can you confirm this has been installed in a Nissan Titan XD AS69RC and works properly with the trans tuning?